We've all been there—that heart-stopping moment when a sudden power cut hits, your computer crashes unexpectedly, or you accidentally click 'Don't Save' after hours of work. It’s a universal feeling of dread for anyone who's poured their time and effort into a document, only to watch it vanish into thin air.
But that sinking feeling doesn't have to be the end of the story. Microsoft Word is actually pretty good at looking out for us, with a few safety nets built right in. Your best line of defence is a feature called AutoRecover, which works quietly in the background, saving temporary copies of your work as you go.
Why Do Documents Go Missing in the First Place?
Losing a document isn't just a fluke; for many Kiwis, it's a frustratingly common problem. Accidental data loss is a real headache across New Zealand, with studies showing around 35% of office workers lose a file due to a crash or an unsaved closure at least once a year.
It's estimated that a whopping 60% of these incidents happen during unexpected shutdowns where no one had a chance to hit save. You can dive deeper into these local IT trends to see just how widespread the issue is.
This guide is here to walk you through the recovery process, step-by-step. We'll cover different methods for different situations, giving you the best possible chance of getting that file back.
The most important thing is not to panic. More often than not, a version of your document is still hiding somewhere on your system. A calm, methodical approach is your best bet for finding it.
Whether you're working from a PC in Christchurch, a Mac in Wellington, or using the cloud from anywhere in Aotearoa, a solution is probably closer than you think. Let's get started with the most common and effective techniques.
It’s a heart-sinking moment we’ve all been through: hours of work on a Word document, gone in a flash. Whether it’s a power cut, an unexpected crash, or just closing the wrong window, the panic is real.
But don't despair just yet.
Both Windows and macOS have some clever, built-in safety nets designed for exactly these situations. Word is constantly squirrelling away temporary versions of your work in the background. It's just a matter of knowing where to look.
We'll walk you through the go-to recovery spots on your computer, with no jargon—just simple, Kiwi-friendly steps to get that file back.
Finding AutoRecover Files on Windows
Microsoft Word’s best defence against data loss is its AutoRecover feature, which automatically saves a draft every few minutes. These files are tucked away in a hidden folder.
To get there, open your File Explorer, click in the address bar, and paste the following path, making sure to replace [YourUserName] with your actual Windows username:C:Users[YourUserName]AppDataRoamingMicrosoftWord
Once you're in the folder, look for any files with a .asd or .wbk extension. The easiest way to find the right one is to sort the files by 'Date Modified'. Open any likely candidates in Word, and if you find your missing work, use 'Save As' immediately to secure it properly.
A few tips:
- Double-check you’re using the correct username in the file path, otherwise you’ll just get a "file not found" error.
- If you don't see any .asd files here, don't worry. Your next stop is Word's built-in recovery tool.
- Getting familiar with this folder now can give you a bit of confidence for the next time disaster strikes.
Using the "Recover Unsaved Documents" Feature in Word
If the AutoRecover folder comes up empty, Word has another trick up its sleeve. This one is built right into the program's menu and it’s often the quickest way to find what you’re looking for.
From inside a blank Word document, navigate to File > Info > Manage Document, and then select Recover Unsaved Documents.
This will open a folder showing all the unsaved .asd files that Word has stored.
- Look for the file that has the right date and time stamp.
- Select it and click Open to see what’s inside.
- If it's the right one, hit Save As and give it a new name and a safe home on your computer.
- It's a good idea to close any other unsaved documents at this point to avoid accidentally overwriting anything.
“A calm approach beats panic—Word usually has a backup waiting.”
Searching for Temporary Files on Windows
Okay, so what if both AutoRecover and the menu option fail? There’s one last place to check on a Windows PC: the temporary files folder. This is a bit of a long shot, but it has saved my bacon more than once.
Word sometimes creates temporary files with a .tmp extension. You can search for these by opening File Explorer and pasting this path into the address bar (again, replacing the username):C:Users[YourUserName]AppDataLocalTemp
In the search bar at the top right, type *.tmp and hit Enter. To save time, use the search filters to only show files modified around the time you were working. You might have to open a few different files in Word or even a text editor like Notepad++ to see if your content is hidden inside.
Digging Up Recovery Files on a Mac
For those on a Mac, the process is a little different, as macOS hides AutoRecovery files deep within the user's Library folder.
Here’s how to get there:
- Open Finder and click on the Go menu at the top of the screen.
- Hold down the Option key, and you'll see 'Library' appear in the menu. Click it.
- Alternatively, click Go > Go to Folder and paste in this path:
~/Library/Containers/com.microsoft.Word/Data/Library/Preferences/AutoRecovery - You're looking for files that start with "AutoRecovery save of…". Find the one with your document's name, open it in Word, and immediately use Save As.
If you were saving your document to OneDrive or iCloud, be sure to check those folders as well. Sometimes a more recent version is waiting for you there.
Checking the TemporaryItems Folder on a Mac
If the AutoRecovery folder on your Mac is empty, there’s one final spot to check—the system’s temporary directory.
Open Finder, click Go > Go to Folder, and paste in /private/var/folders. This will take you to a folder with a bunch of randomly named subfolders. You'll need to do a bit of digging here to find a folder called TemporaryItems. Scan through it for any files that look like they belong to Word and open them in Word or TextEdit to check the contents.
To make things a bit clearer, the infographic below gives you a simple decision tree to follow when you're trying to track down a lost Word document.
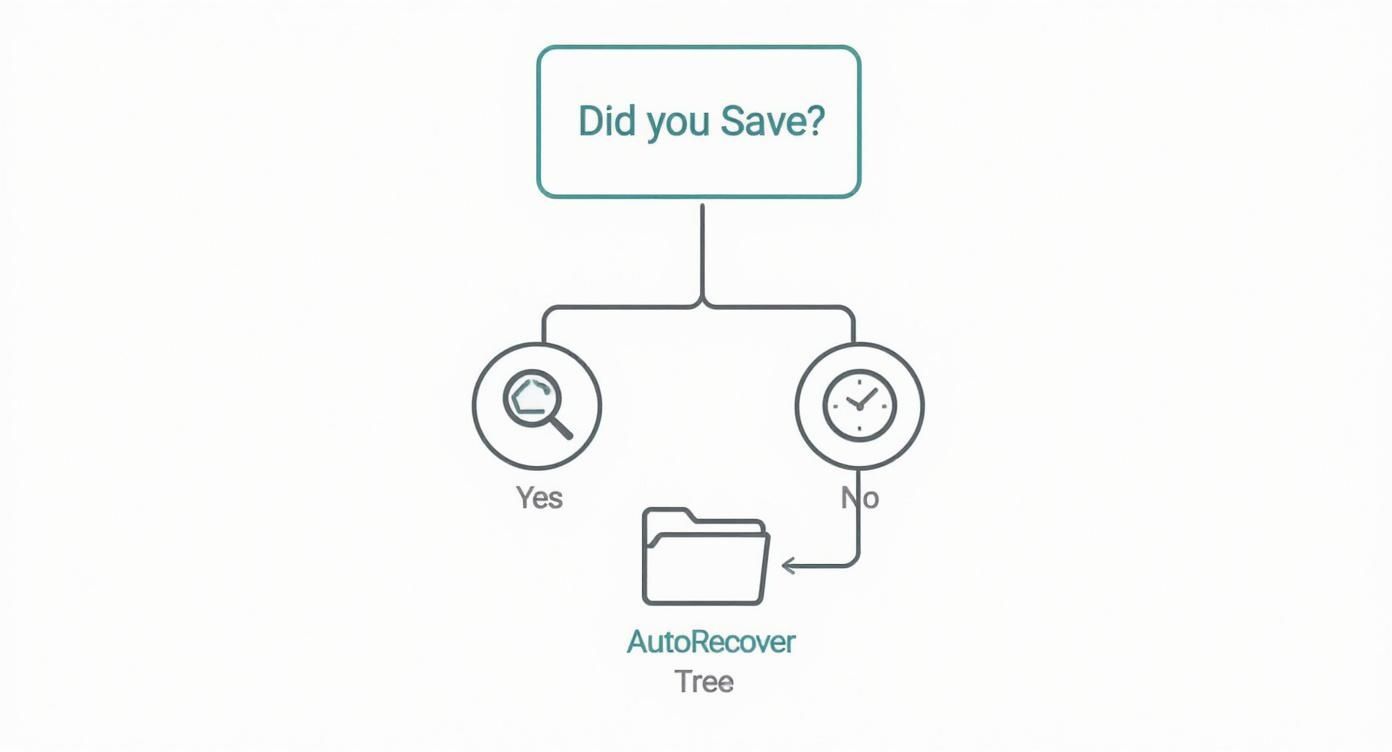
As the chart shows, your first move should always be to double-check if you saved the file. If not, AutoRecover is your best and fastest bet, with a manual search through the temp folders acting as your final backup plan.
By following these platform-specific paths, most Kiwis can rescue an unsaved Word document without needing any special software. If you've tried everything and still come up empty, it might be time to think about a more robust cloud or backup solution for the future.
Using Cloud Recovery with Office 365 and OneDrive
For modern workplaces across New Zealand using Microsoft 365, that stomach-dropping moment of losing a document is thankfully becoming a thing of the past. If your business saves files to OneDrive or SharePoint, you already have a powerful, cloud-based safety net that makes getting that work back much, much simpler.
This is all thanks to a fantastic feature called AutoSave. It’s a huge leap from the old AutoRecover function, which only saved a local copy every few minutes. AutoSave, on the other hand, saves your changes in real-time, directly to the cloud. Every single sentence you type, heading you format, or image you add is backed up instantly. The version you see on your screen is the most current saved version.

This constant syncing is an absolute game-changer for remote and hybrid teams. A staff member in Auckland can be editing a document, and their colleague in Dunedin will see the changes pop up almost instantly. Better yet, there's no risk of losing work if the power suddenly cuts out.
Accessing Previous Versions with Version History
But what happens if you accidentally delete a crucial paragraph or save changes you immediately regret? This is where another brilliant feature, Version History, comes into play.
Version History keeps a running log of all the changes made to your document over time. It lets you browse through all the previous versions and restore an older copy with just a couple of clicks. It's essentially a time machine for your work.
Here’s how to access it:
- Open your document in Word.
- Click on the file name at the very top of the window.
- Select Version History from the dropdown menu that appears.
- A panel will then open on the right, showing a list of previous versions, each with a timestamp. You can click on any version to see exactly what the document looked like at that moment.
Found the version you need? Just click the Restore button, and it becomes the current, live version. It's incredibly useful for undoing unwanted edits or bringing back content that was deleted by mistake.
Checking the OneDrive Recycle Bin
Even if a file gets completely deleted, it’s usually not gone for good. When you delete a file from OneDrive or SharePoint, it’s first moved to the Recycle Bin. It sits there for a set period (typically 93 days) before being permanently erased.
Think of this as your final safety net. If you’ve looked everywhere and still can’t find your document, checking the OneDrive Recycle Bin is a crucial next step. You can get to it through your web browser by logging into your Microsoft 365 account, heading to OneDrive, and finding the Recycle Bin link in the sidebar.
For businesses, these cloud features offer far more than just convenience; they're essential for business continuity. Real-time saves and easy versioning mean a system crash or an accidental deletion is just a minor hiccup, not a major disaster.
Local vs Cloud Recovery Methods in Microsoft Word
It's helpful to see just how different the old and new methods are. Here's a quick comparison of traditional local recovery versus the more robust cloud-based solutions built into Microsoft 365.
| Feature | Local Recovery (AutoRecover) | Cloud Recovery (AutoSave & Version History) |
|---|---|---|
| Save Frequency | Every few minutes (e.g., 10 mins), creating a local temporary file. | Real-time, continuous saving with every change made. |
| Collaboration | Not designed for it. Can lead to version conflicts and lost edits. | Seamless. Multiple users can edit simultaneously with changes visible instantly. |
| Version Control | Very limited. Only the last auto-saved version is typically available. | Comprehensive. Keeps a detailed log of all previous versions you can restore. |
| Data Loss Risk | Higher. Work between saves is lost if a crash occurs. File can corrupt. | Extremely low. Changes are saved to the cloud instantly, protecting against loss. |
| Accessibility | File is stored on a specific device. | Access the latest version from any device with an internet connection. |
| Best For | Offline work on a single machine or as a basic fallback. | Collaborative projects, remote work, and ensuring maximum data protection. |
As you can see, while AutoRecover is still a useful fallback, the cloud-based features in OneDrive and SharePoint offer a far more reliable and powerful way to protect your work.
These cloud features are a big step forward. As of mid-2024, around 62% of NZ businesses are using Microsoft 365. These platforms combine AutoSave with frequent cloud snapshots, which dramatically improves the chances of recovering an unsaved Word document. In fact, Kiwi companies using these services see about a 70% reduction in data loss incidents. You can learn more about how Microsoft organises these powerful backup features.
While Microsoft's built-in tools are excellent for immediate recovery from common mishaps, a dedicated external backup adds another critical layer of defence. This protects you against more serious threats like ransomware or a compromised account. To understand more, you can explore our detailed guide on cloud backup for Office 365.
What To Do When Standard Recovery Methods Fail
Sometimes, you’ve tried every built-in trick in the book, but the document you need remains stubbornly lost. This usually happens when you're dealing with a deeper problem than just a simple unsaved file—think file corruption, a failing hard drive, or a serious system error. When Word’s own recovery options don’t cut it, it’s time to bring in the heavy hitters.
In these moments, the problem might be bigger than a single file. If standard document recovery keeps failing because of underlying system issues, you may need to utilise Windows System Restore as a wider recovery measure. Winding your system back to a healthier state can sometimes make those inaccessible files visible again.
Turning To Third-Party Data Recovery Software
When the native tools just aren't enough, specialised data recovery software is your next best bet. These programs are built to perform deep scans of your storage drive, hunting for the fragments of deleted or lost files that are still physically there but invisible to your operating system. They can then piece these fragments back together to reconstruct your original document.
These tools are particularly good in situations like:
- Accidental Deletion: Getting back files you’ve permanently deleted, even after emptying the Recycle Bin.
- Drive Formatting: Retrieving data from a drive that has been accidentally formatted.
- File System Corruption: Finding files when the drive’s whole structure is damaged and unreadable.
It's a common misconception that a deleted file is gone forever. In reality, its data often lingers on the drive until new information overwrites it. This is the window of opportunity where recovery software works its magic.
When You Need To Call In The Professionals
For critical business data, a DIY software approach sometimes isn't enough—the risk is just too high. A real-world example from a New Zealand business makes this perfectly clear. A 2025 case study revealed a construction company lost six months of vital quotes when a storage device became corrupted. They managed to retrieve 98% of their lost data, including those crucial Word documents, by using advanced data recovery tools designed for the local market.
This is where the line between recovery and prevention becomes crystal clear. While these methods are powerful, they're entirely reactive. A much smarter strategy is having a robust, automated backup system in place from the start.
At Backup, our Christchurch-based team provides nationwide solutions to ensure you’re never in this desperate situation to begin with. Our service creates secure, restorable copies of your files automatically, so you don't even have to think about it. You can learn more about how to restore your files effortlessly with our system. With that kind of protection, a corrupted file or a failed hard drive becomes a minor inconvenience, not a business-stopping catastrophe.
Building a Proactive Document Protection Strategy
Knowing how to recover an unsaved Word document is a handy skill, but honestly, the best approach is making sure you never need it in the first place. This means shifting your mindset from reactive panic to proactive protection. It all starts by getting the most out of the tools you already have, before layering on a proper, professional-grade safety net.

First things first, let's configure Word’s own settings for maximum protection. The default settings are a good start, but with a few small changes, we can make them much more robust.
Fine-Tuning Your AutoRecover Settings
Think of Word's AutoRecover feature as your first line of defence against a sudden computer crash or the application freezing. By default, it saves a copy of your work every 10 minutes, which is better than nothing, but you can definitely tighten that up to minimise any potential data loss.
Here’s how to adjust the setting in Word:
- Navigate to File > Options > Save.
- Find the option "Save AutoRecover information every".
- Change the value from 10 minutes down to something much shorter, like 2 or 3 minutes.
It's such a simple tweak, but it ensures that if something does go wrong, the version Word brings back will be much, much closer to where you left off. A tiny change that can save a huge amount of rework and stress.
The Ultimate Safety Net: A Nationwide Backup Solution
While AutoRecover and OneDrive’s AutoSave are fantastic for those immediate, everyday hiccups, they won't protect you from the bigger threats. What happens if your laptop is stolen? Or if your office server gives up the ghost entirely? What about a ransomware attack that encrypts every single file you own?
This is where a dedicated, automated backup service becomes absolutely essential.
Based right here in Christchurch, New Zealand, Backup offers nationwide backup and security designed specifically for Kiwi businesses. We provide a comprehensive solution that goes far beyond simple file recovery. Our service creates secure, encrypted copies of all your important data, shielding you from hardware failure, file corruption, and serious cyber threats. For a broader look at preventative measures, it's worth reviewing these data loss prevention best practices.
Word’s recovery tools are like having a spare tyre in your car—great for a flat. A proper backup solution is like having full roadside assistance and insurance—it protects you from the catastrophic events.
Our system is designed for simplicity without ever compromising on power. To see exactly how it works, take a look at our guide on how to create a backup plan and select files to back up.
Simple Pricing for Kiwi Businesses
We firmly believe that robust data protection should be accessible and affordable for every New Zealand business, whether you're a sole trader in Invercargill or a growing firm in Auckland. Our pricing is straightforward and designed to scale with your needs.
Here are our popular plans:
- Business 10: $30 per month
- Business 20: $50 per month
- Business 50: $100 per month
- Business 100: $150 per month
But don’t just take our word for it. Experience the peace of mind that comes with a professional backup solution for yourself. We invite you to try our service completely free with a no-obligation 14-day trial. You can set it up in minutes and see just how easy it is to protect your most valuable asset—your data.
We Answer Your Top Document Recovery Questions
Losing a document is a heart-stopping moment. You’re staring at a blank screen where hours of work used to be, and a million questions start racing through your mind. It’s a situation many Kiwis have faced, so let’s tackle some of the most common queries we hear about recovering an unsaved Word document.
Can I Really Recover a Word Document I Never Saved?
It sounds impossible, but the answer is often yes. Even if you never consciously hit the 'Save' button, Word has a built-in safety net called AutoRecover that’s designed for this exact disaster.
Behind the scenes, Word periodically saves temporary copies of your work to a special folder on your computer. These files are your first and best hope. By digging into Word's designated AutoRecover or temporary file locations, you can frequently find a version of the document that was saved just moments before a crash or accidental closure. It's a genuine lifesaver, though it's not always foolproof.
How Can I Stop Word from Crashing in the First Place?
It’s an old saying, but prevention really is better than a cure. If you want to minimise the risk of Word crashing and taking your work with it, you need to focus on two key areas: software updates and the overall health of your system.
- Keep Everything Updated: Make sure both your operating system (Windows or macOS) and your Microsoft Office suite are kept current. These updates aren’t just for new features; they often include crucial stability fixes that patch the very bugs that cause crashes.
- Mind Your Resources: Running too many demanding applications at once can strain your computer’s memory. When resources are low, programs like Word are often the first to freeze or fail.
- Check for Add-in Conflicts: We've seen it time and again—a faulty or outdated Word add-in is the secret culprit behind persistent instability. Try disabling them one by one to see if performance improves.
Think of it as proactive maintenance. Keeping your system healthy by managing updates and your computer’s workload drastically reduces the chances of a sudden software failure blowing up your workflow.
Is OneDrive Enough, or Do I Need a Separate Backup?
This is a critical question for any business, and the answer is clear: OneDrive is not a true backup solution. While its AutoSave and Version History features are fantastic for rolling back accidental edits or minor mishaps, they operate on a file-syncing model.
What does that mean? It means OneDrive mirrors the files on your computer to the cloud. If a file on your machine gets corrupted or, worse, encrypted by ransomware, that damaged version often syncs straight to the cloud, overwriting the last clean copy.
A true backup solution, like the one we offer at Backup, creates entirely separate, isolated copies of your data. Based in Christchurch, New Zealand, but serving businesses nationwide, we provide a service that shields you from major disasters like hardware failure, theft, or a devastating cyberattack. It’s an essential layer of security that file-syncing alone simply can't offer.
Protect your business from more than just unsaved documents. Backup offers a complete, automated data protection service to keep your files safe from any disaster. Start with our no-obligation 14-day trial and see the difference a real backup solution makes.